Showing posts with label cooking and freezing. Show all posts

Wednesday, August 10, 2011

When the moon hits your eye like a big pizza pie*

Last week I put a picture of Chef Maya up on the Facebook page, taken during a pizza making party . . . here's the whole story.

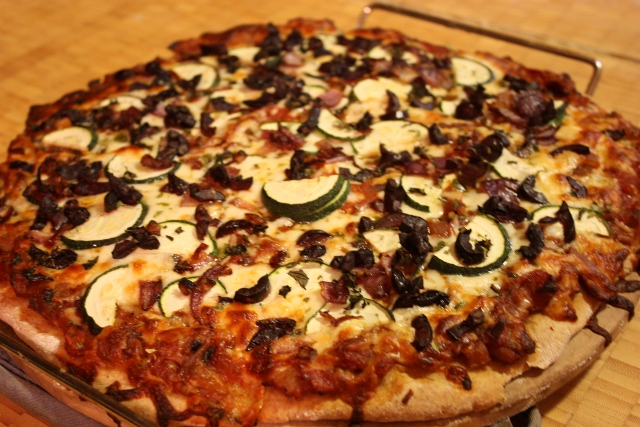
Homemade pizza is one of my go-to meals in the summer time---it's the perfect way to use up whatever random vegetables that I have left over from the week's CSA.  While amassing ingredients on the counter, I realized that pizza is a perfect meal for Maya to help make.  So we threw on her chef outfit (party favors from a friend's birthday party!) and got down to business.

Zuchinni, shredded cheese, sauteed onions, olives, oregano, basil, leftover veggie pasta sauce, and pizza dough from the freezer


Making pizza?! I can't wait!


We put flour on the counter . . .
  . . . and Maya did not want to touch it.

We kneaded the dough . . .
  . . . and Maya did not want to touch it.


 But she sure looked cute :)

Daddy threw the dough . . .


 . . . and Maya thought it was hilarious!

When it was time to roll the dough . . .
 . . . Maya wanted to play with the radio.

When it was time to put on the sauce . . .
. . . Maya wanted to bang her spoon in the sink.

And then, finally, we found something that she liked: 

CHEESE! (Really, who doesn't like cheese?)

She hasn't learned about symmetry yet.

We added some toppings . . .

Ta-DA!!!


Yum :)


The verdict:  delicious and fun, despite the fact that Maya was semi-uninterested during much of the process.

Friday, June 17, 2011

All the cool kids make (really easy, I swear) homemade yogurt

Brief disclaimer: my computer imploded.  I'm blogging from an old loaner that is working less and less as the days go by.  If I disappear briefly, keep the faith---the new laptop is arriving on Weds. 


Maya loves yogurt.  It was the first "real" (as in something grown-ups also eat) food that she ate.  We started with the Stonyfield Farms Cream Top Vanilla (yum) and then switched over to Fage whole milk greek yogurt (which is much thicker than regular yogurt) when we wanted to help her progress to thicker textures.  She still eats the Fage (plain, we add honey to it) several times a week.  It's a big favorite, but it's $8 for a 32oz container. 

Enter the homemade yogurt idea :)

I've heard of making yogurt in the crock pot, but without knowing anyone who had really tried it I was hesitant.  So when a friend took the plunge and I was able to quiz her about the results (which seemed great!) I decided to give it a shot.  Here's what I did:  (You can browse around online, but all of the recipes are basically the same)

Ingredients
Half a gallon of milk (*I read somewhere not to use ultrapasteurized milk.  My milk is just regular pasteurized and worked fine)
1/2-3/4 cup of plain yogurt (this is where the active cultures that turn your milk into yogurt will come from)
That's it :)
(Optional ingredients:  You can add vanilla or honey to sweeten the yogurt during the production process---I don't do that, and I'll explain why later.  You can also add powdered milk to up the protein content and help thicken it a bit, which I do.)

Other stuff you need
A crockpot
A strainer and/or cheesecloth if you want thick, Greek-style yogurt

Directions
1. Pour milk into the crockpot (mine is 4 qts and works well).  Set it on low for 2.5 hours.


2. Then, turn the crockpot off.  Let it sit (off and unplugged) for 3 hours.
3. Next, remove 1-2 cups of the milk and put it in a small bowl.  Add the yogurt and whisk together to combine.  (This is when I also add the powdered milk---I mix in about 2/3 of a cup.)
4.  Dump the small bowl back into the crockpot and stir to combine.
5.  Wrap a large towel around your (unplugged) crockpot and let it sit for 8 hours. (No, I'm not kidding.  This looks weird, but this is where the magic happens.)


6.  Now you have yogurt!

It tastes better than it looks, I promise.  I don't think any type of yogurt photographs well.  At least not with a cell phone camera and kitchen lighting.

7.  If you want thick, greek-style yogurt, now you strain it.  I use a strainer lined with cheesecloth (which I found at the hardware store, but my friends tell me you can also find it in the baking section of many stores).  Pour the yogurt into the cheesecloth-lined colander (inside another bowl to catch the whey that drains out) and let it sit in the fridge overnight (or until you reach your desired thickness.)


(dramtatic reenactment--there's not yogurt in here, but you get the idea)

Important! If you plan on making more yogurt, before you strain off the whey set aside 1/2-3/4 of a cup of the yogurt so that you have a starter for your next batch!


My review:
It's delicious and cheap!  I didn't let it thicken long enough to get the same consistency as Fage, but it's good anyway.  It's a little bit milder than store bought yogurt (which I prefer)---I wonder if it would get more tangy if you let it sit for longer than 8 hours (and the cultures continued to work in there).   I made full fat for Maya (which I had with honey the other night for dessert) and today I'm making a pot of skim for Dave &I (I'll update on how the skim turns out after it is strained, which will be overnight tonight).

The time commitment isn't that bad---you have to start it, be around in 2.5 hrs, and then be around 3 hours after that.  Takes a minimum amount of mental math and planning.

It's a lot of yogurt for the price of a half gallon of milk, and you get to control the thickness and quality of ingredients.

Other thoughts:
This stuff has endless possibilities . . . it's not like you're just strictly making yogurt, it's like making a creamy dairy product.  You can sweeten it with honey, fruit, or fruit purees----although I read reviews online that said it's better to do that to single servings because if you mix in all the fruit up front the yogurt loses a little bit of its thickness. 

You could keep it on the savory side by using it as a sour cream substitute.  If you let it thicken a lot, you would end up with yogurt cheese.  Although it may sound questionable, it's kind of like a cream cheese spread---for bread, crackers, bagels, etc.  I imagine you could get creative by mixing spices, chives, etc into the yogurt cheese---homemade cream cheeses?  Super fancy!

About the whey:
Allegedly the whey (which is the liquid that drains off if you decide to strain the yogurt) is a great substitute for buttermilk.   I don't think I've ever cooked anything that required buttermilk, but if you do (I've heard that pancakes and other baked good recipes often use it) then try it out.  I read that you can also freeze the whey to use it later---if you do that, I would freeze it in ice cube trays for easy measuring and defrosting later.  This blogger also says you can add the whey to smoothies for a nutritional boost.

In conclusion
Not only is making yogurt cheap, but I feel like a total badass homemaker.  It makes me want to wear a little apron skirt (well, I'd have to buy an apron skirt first---but then I would wear it) and heels in the kitchen.  I wish I had a t-shirt that says "I make my own yogurt", for real.  I think if you do it, you get serious bragging rights. 

Monday, June 13, 2011

Poultry in the alphabet hallway

Side note: I don't know why the last 4 pictures here are sideways.  I'll try reuploading them again later and hope that blogger is working better.  For now, turn your computer or your head 90 degrees to the left.  If you have a desktop, I suggest turning your head.

I've been in major DIY mode the past few days.  Maya & I took a trip to Lakeshore over the weekend, where I had to restrain myself from buying up every alphabet/sight words/colors/shapes/numbers product that they have.  I bought a bunch of stuff and walked around snapping cell phone photos of everything that made me think "I could make that at home.".

(Side philosophical note: I am not a huge proponent of forced education on little kids.  I think toddlers should get to play like toddlers.  But Maya loves letters . . . and she loves words.  Her favorite hobby this week is sitting on the floor and reading magazines, pointing and yelling at the pages that have ads with giant font letters.  So if she likes letters and words, then I'm going to surround her with them.   For as long as she is nonverbal, she will be underestimated by the masses, and I'm going to help her get as friggin' smart as she can, so that she will surprise and enlighten many people . . . teaching them not to judge a book by its cover, for sure.)

Anyway, I've been busy with my trusty laminator:


I totally love one project that I did today.  I bought alphabet cards, trimmed them so that I could squeeze in 2 per laminating pouch, cut them out, and lined the hallway with them (at Maya's eye level, not mine). (They have to be laminated because otherwise they would likely be crumpled/bent/torn up at some point)

laid out and ready to tape up

One side done

She was pretty excited to wake up from her nap and see a letter-filled hallway :)

As I walked past the kitchen, I noticed that it was looking very industrious today as well.  Those are some herbs from a weekend fair that I need to repot, a rice cooker that was making rice for tonight's dinner, and my crockpot, in which I'm attempting to make homemade yogurt.  If it works out, it will be a delicious money saver----but I'm not counting on anything until I taste the first batch.


And Maya had a typical 4-therapy Monday.  During the day's last session, I shot a little video.  Just typical therapy . . .


Oh yeah, except the ducklings were back.  And big enough now that they just waddled free.  Dave came home, got changed, peeked into the living room and said "There are ducks?  Wandering around our apartment?"  Seems about right, I think. 

Maya was delighted to see them again, especially was one frisky duckling started tickling her:


Hey!  That's my foot!

Oh, duckie, that is just too tickly!

Virginia got them to follow her into the hallway . . . 


. . . and when they decided to all lay down, we said "Maya, look, the ducks are tired.  They're resting."  . . . so she decided that it would be best to lay down and rest, too.

Goodnight, ducks.  I'm right here if you want to cuddle.

Wednesday, September 15, 2010

Talking and apples

Maya is trying to communicate more and more, sometimes with very frustrating results.  She is signing things that I don't understand, and does a lot of pointing (which I also sometimes don't understand).  She's developing a habit of grabbing my face and squeezing it (ouch) when she wants to tell me something.   I'm going to work today and tomorrow at trying to get picture magnets printed so that we can try using a picture system (when I printed them and laminated them, she just wanted to play with the little cards---hopefully magnets will work better.  Who knows.)

Anyway, yesterday I was feeding her a cereal bar and vacuuming.  She was on the floor, and I would give her a piece, vacuum for a minute, stop the vacuum, ask her if she wanted more, she would say "Mo, mo" and I would give her another piece.  I guess at one point I vacuumed for too long (and obviously I can't hear her little voice over the vacuum) because suddenly I felt something on my leg and when I looked down she was there.  She was holding her hands up to me and rapidly signing "More! More! More!"  She certainly knows what she wants :)  In she could talk I think she would have been saying "Hey!  Come on!  I'm starving here!"

Speaking of food, our apples are almost gone!  Most went to applesauce, a few went to apple bread. 

Here are the recipes (both of which were really easy):

Chunky Cinnamon Applesauce

Ingredients: Apples, cinnamon

Directions: Peel, core & roughly chop apples.  Put them in a crockpot with cinnamon.  Cook them until they're done enough for you.  (Low overnight or for most of a day, probably . . . high for 3-5 hours I think).  Ta-da!

Freezing: Since we all like the applesauce, I didn't freeze it in cubes (my usual MO for sauces/soups/liquidy things).  I just cooled it in the fridge, put it in a ziploc quart size freezer bag, and froze flat.


Apple Bread--makes 2 loaves!!!! (courtesy of my sister, with a little tweaking from me)

Ingredients:
1/2 cup applesauce
1/2 cup vegetable oil
3 eggs
2 cups sugar
1 tsp vanilla extract
3 cups diced apples (2-4 apples, depending on size)
3 cups flour (I used bread flour, it was the only thing I had on hand, and it worked fine)
1 tsp baking soda
1 tsp cinnamon
1 tsp salt

Directions: In one bowl, combine the first 6 ingredients (up to and including the apples).  In a second bowl, combine the last 4 ingredients.  Next, combine the two bowls together.  Grease two loaf pans well and bake a 300 for 90 mins. (Warning: The pans will only be half full or so when you fill them--don't worry, it will puff up)

This recipe is good, but it you want to make it fantastic, add a crumbly top (kind of like a coffee cake top):
Combine 1/4 cup brown sugar with 3 tbl flour, then use your fingers to mash in 2 tbl of butter until it forms coarse crumbs.  Sprinkle across the top of the loaf before baking----yum!!!  (I did this for each loaf and it was really good.) (Thanks, HCM, for the crumbly top help!)

Freezing: We ate one loaf and froze the other.  Cut it into slices, freeze flat, then put the slices in a gallon size ziploc freezer bag.

Friday, August 27, 2010

Clean, Play, Cook

1.  Operation Clean House is still in full effect here.  We just cleaned out the top shelves in the closet, which consisted of: unwearable old clothes, clothes with tags still on them, framed pictures that hung on the wall of our old apartment (yes, about 3.5 years ago).   Oh, and three bottles of colognes---different ones.  So we sprayed all of them to see if any smelled good (FYI, not the best idea to spray 3 bottles of men's cologne in an unventilated closet). 

2.  Here's a taste of our morning:  Maya, Parker & I hit the playground for a bit.  It's getting easier to manage both of them on my own at the playground, now that Parker is older and more obedient.  We have to adjust ( or avoid) depending on how crowded it is, but today he just hung out on the side while Maya climbed around.  He'll watch birds, and kids running by, without moving at all---but when people approach him or talk directly to him he'll get up to say hi---we're working on that.


3.  We finally got some ground beef---for the first time in months.  This ground beef is fresh (well, frozen, but whatever) from Lewis Waite Farm, a local farm that raises grass fed, grass finished beef.  It's certainly pricier than regular ground beef, but it looks better and smells better (like a LOT better) and is better for us.  And supports local (and responsible) agriculture, cuts down on fuel for transporting food cross country, etc. etc.  (If you're into food stuff/local stuff, some good reads are Animal, Vegetable, Miracle by Barbara Kingsolver, or anything by Michael Pollan.  Or you could take the easier route and watch Food, Inc.  Everyone who buys or eats food should really check out that movie.)


Anyway, the ground beef pictured above was turned into meatloaves, which were cooked & frozen in slices.  (And although I find the name "meatloaf" kind of digusting, I swear it's really good.)  That's a whole bunch of easy lunches/dinners.  And I have a great meatloaf recipe----I think it came from Gourmet magazine . . . but I cheated with a few things (we don't need ground veal, so I just do ground beef for the full meat amount), so it's "Almost Gourmet" Meatloaf:

Ingredients:
2 lbs ground beef (or whatever meat or blend of meats you want)
1/4 cup minced green pepper
3/4 cup minced onion
1/2 cup sliced mushrooms
2 tbl horseradish
1 tsp dijon mustard (or whatever mustard you have)
ketchup
2 eggs
1/4 cup milk
2 cups fresh breadcrumbs (or whatever breadcrumbs you have in a can)
2.5 tsp salt
pepper
4 slices bacon (uncooked.  I like to chop up a few more slices of bacon and add them into the mixture, too)

Instructions: Combine everything except for the bacon slices.  Knead it all together.  Put it into a greased loaf pan and lay the bacon slices on top.  Then coat the top with a thin layer of ketchup (on top of the bacon and the whole thing).  Bake at 400 for 50 minutes, let cool 10 minutes before serving.

Freezing: After it's totally cooled off (like in the refrigerator for a few hours), slice into, well, slices.  I freeze the slices flat, then load them into a gallon sized ziploc bag after they're frozen. 

Eating: A dinner would be 1 slice of meatloaf, plus potatoes and 2 types of vegetables---so one meatloaf can really last for a lot of meals.  It makes an easy lunch too.

Friday, August 20, 2010

Food, glorious food! (Cooking, Freezing & Eating 101)*

I've been busy the past few days cooking &; freezing, stocking up the freezer a bit.  Cooking a whole meal at dinner time is difficult, since I'd rather spend the time with Dave & Maya once he gets home from work . . . cooking & freezing lets us have whole meals, or meal components, prepped ahead of time so that the nightly hands-on time is minimized.  (Note to my fellow apartment dwellers:  we have a chest freezer on our terrace, which gives us substantial freezer room.  But I bet that if you cleaned out some old random stuff and organized your freezer you could fit a lot of meals in there, as well.)

Below you will find a few recipes & pics of stuff that I like to keep on hand in the freezer.  Once we get some ground beef (we haven't had any for a few months, we've been waiting to order it from a local farm----which should happen this weekend!) I'll add in some pre-cooked taco meat (in ziploc bags), meatballs, and meatloaf slices.  My "recipes" are often done to taste, and tend to be kind of "throw in poultry seasoning until it tastes good"ish, but they're a start, I guess.   The freezer techniques are helpful if you want to freeze stuff but you've been unsure how to start.

And sometimes, we just go out to eat :)  Like this afternoon, when we went for seafood at City Island (pictures on the blog's Facebook page) or this evening, when we headed out for yummy Italian food in NYC's real Little Italy (aka Arthur Avenue, in the Bronx).  Here are Maya & I, all dolled up and ready to go out to dinner:


Ok, the food.  Here we go . . . easy things to make and freeze:


1. Pesto/Other Sauces (lower right bag)  The real trick with soups & sauces is to freeze them in ice cube trays.  It takes longer to freeze, but then you can defrost however many cubes you need, instead of trying to sloppily defrost a whole ziploc bag of sauce & wasting some.  

Ingredients: basil (2-3 bunches), spinach (one bag), pine nuts (aka pignoli nuts), olive oil, grated parmesan cheese (freshly grated is best)

Method: In a food processor, process the basil & spinach.  Drizzle in olive oil until it looks nice and smooth.  Add in pine nuts & cheese, a bit at a time, and keep tasting it until it tastes the way that you want it to :)  Warning: The cheese can make the pesto very salty, so add it slowly.

Freezing: Freeze in ice cube trays, then pop the cubes into Ziploc freezer bags.


2. Chicken pot pie (lower left bag): A fantastic way to use leftover chicken/turkey, and you probably already have a lot of this stuff laying around anyway.

Ingredients: 1 onion (chopped), 3 carrots (chopped), 2 stalks celery (chopped), 2 potatoes (peeled & chopped), 2 tbs parsley, 2 cups cooked chicken/turkey (cut into small chunks), 4 tbs flour (whatever type you have), 4 cups chicken stock (or 4 bouillon cubes + 4 cups of water), 1 cup of frozen peas (or half a cup--I love peas), a chunk of butter, seasonings

Method: Melt butter in pan, add onion, saute a few minutes.  Add carrot & celery, saute a bit more.  Stir in flour and (you guessed it) saute a few more minutes.  Add whatever seasonings you like (I like poultry seasoning, salt & pepper, maybe some sage).  Add the broth, bring to a boil.  Add potatoes, simmer until they're tender.  Then stir in the chicken, peas & parsley.  You're done!

Freezing: Let it cool (probably in the fridge).  Dump into a gallon size ziploc bag and freeze it flat.

Eating: When you're ready to eat it, defrost and dump it into a 9 x 13 glass pan (or whatever you have).  Top it with pie crust (I used frozen, don't use the graham cracker kind-obviously)---it takes me 2 frozen crusts to top it, broken into pieces, don't worry if it doesn't look pretty . . . it will taste great.  Bake at 350 until the crust looks cooked (maybe 25 mins?).  Yum!

3. Lasagna  (top bag):  Frankly, I'm tired of typing recipes, but you can see that I cut the lasagna into chunks before freezing.  If you want to freeze a tray of anything, the best way to do it is to cut into slices or chunks, and freeze those first.  An hour or two in the freezer and they won't be freezer burned, they'll just be independently frozen.  Then you put those into a big ziploc bag and ----viola!---you can easily defrost a slice or two for dinner anytime.   

(I'll continue my "Cooking & Freezing" series with more recipes & tricks if people are interested.  For now, I'm done.  If YOU have any ideas for ME as for things to do with 6 lbs of tomatoes, please post on Facebook, or here, or email me at: uncommonfeedback@gmail.com .  We got a lot of tomatoes from the CSA this week!)